File separation root canal re-treatment

The case I’m showing you today was referred to me for a re-treatment, as you can observe in the picture, there was a broken file on the distal canal with a big apical periodontitis. The treatment was planned to be done in two appointments. In the first one I removed the broken file, and placed calcium hydroxide for 25 days; In the second appointment the tooth was symptomless and I completed the treatment.

After 4 months the patient came for a review and the PA showed new bone formation, so the infection was healing.

I usually like to finish the treatments in a single appointment but is not a rule, time management has to be consider as another variable in root canals treatments and sometimes, is better to do it in two appointments and some others we need even three appointments.

Our greatest weakness lies in giving up. The most certain way to succeed is always to try just one more time.

PhD. MSc. Dr. Pablo Salmeron.

4 handed dentistry

In this post I’m going to talk about how important is to work ergonomically in dentistry and endodontics.

I like to think that modern dentistry is about details, patients nowadays are more conscious about the differences between good and bad jobs, Internet (Facebook, Youtube, Blogs…) has resulted in a great tool that has impacted on dentistry significally giving the oportunity to patients to check and investigate the perfomance of dentists before attending their practices. Patients not only research and compare differents jobs, they tend to discard all those professionals with no history on internet or those afraid to show their work fearing to be compare to other colleagues. Today, if you don’t show your work, you don’t exist.

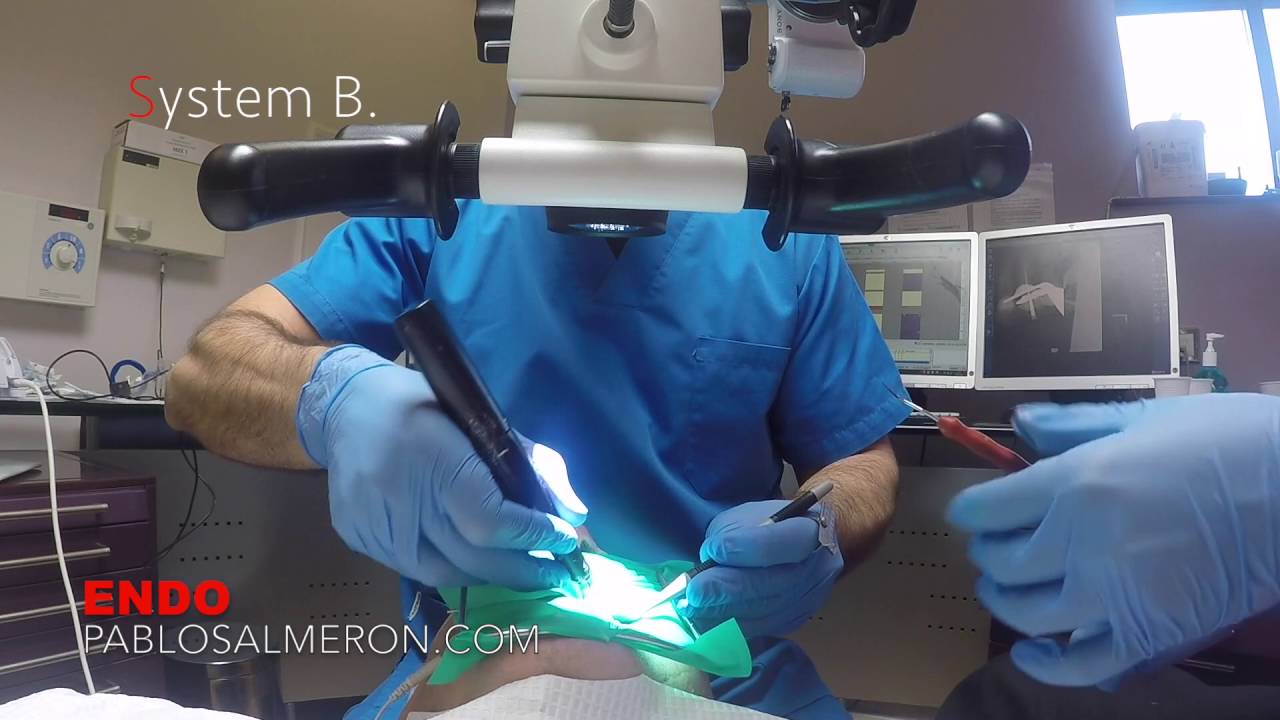
I don’t want to deviate my topic “4 handed dentistry” whit that short reflextion. Dentistry is about details and there is only one way where we’ll be able to work on it, we need to bring the object we are working with closer, that means MAGNIFICATION. “Traditional” magnification is to bend our back over the patient 90 degrees. Our eyes have some limitations to focus objects to a certain distance, more closer doesn’t mean that we see things bigger. So to be able to work on details we need to see things bigger, and there is only two solutions: 1) the use of loupes or, even better, 2) the surgical microscope. I’m not going to talk about the differences between loupes and microscopes because again that’s another topic, “Microscope is better of course :D”.

Going back to the topic, what I want to talk about is about 4 handed dentistry which, if you are able to implement little by little training your assistant, your work will radically change, letting you be more focused and relaxed doing your job, meaning, better treatments and happy patients.

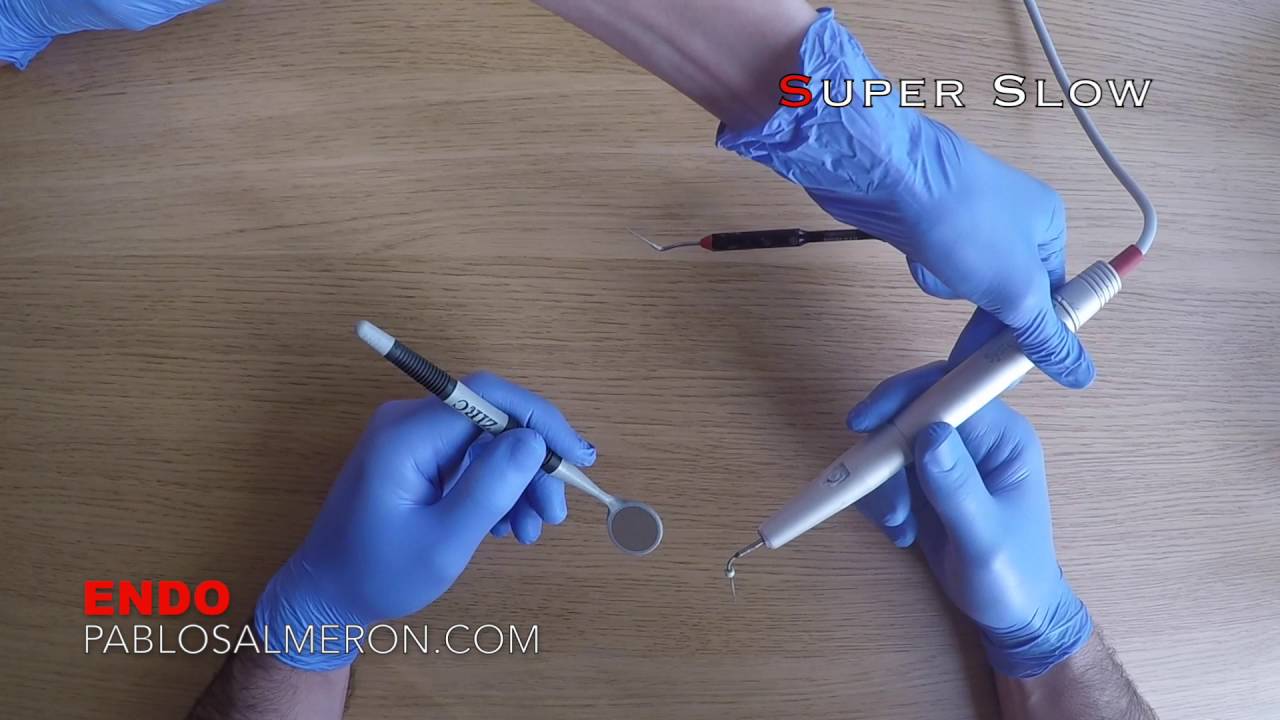
So the first question we should ask ourselves is, ¿Do we need as a dentist any instrument in our side? no we don’t or at least as minimum as possible. A surgeon in an operating theatre never picks up his own instruments, the nurse do it for him, I do microsurgeries and I like to be as focused as possible on my operating field.

With the next two videos I want to show you, in a very basic way, how to pass instruments with your assistant and how you can work after some training. There is more than one technique and the location of your instruments and nurse will vary depending on your surgery setup. I hope you start and benefit implementing 4 handed dentistry in your practice.

YouTube player

YouTube player

Make it a point to do something every day that you don’t want to do. This is the golden rule for acquiring the habit of doing your duty without pain.

PhD. MSc. Dr. Pablo Salmeron.

How to bypass a ledge

YouTube player

As you can see on the video, please watch it on 720p50 HD, the case I want to show today is a re-treatment of a lower left six first molar #36. The tooth presented a ledge and missed canal on the mesial root and another ledge and a broken instrument on the distal.

Before and after

Although ledges sometimes can look easy to bypass, is not always possible to do mainly because of the location of the ledge and the patient’s opening mouth range.

Our instruments are flexible but tend to work in a straight line because their memory effect. To bypass and fix this kind of problems, we need to approach the canal in the proper angulation and as I said, sometimes is really tricky because of the limited opening range of the patient. We need to pre-bend our instrument with the proper angulation and remove dentin, as less as possible, from inside of the canal with small ultrasonic tips in order to straighten the access. A CBCT will allows us to visualize the anatomy of the root and identify the real angulation of the canal which is something we have to keep in mind when we try to bypass the ledge.

Patient, knowledge of the anatomy and the use of high magnification as the surgical microscope are the keys to success in this kind of treatments.

“Remove know from knowledge and you are standing on the ledge”.

PhD. MSc. Dr. Pablo Salmeron.

Pulp stone

YouTube player

In this case, I found a pulp stone inside of a mandibular second molar. Dental pulp tissue can form dentin or osteodentin in the reaction to the homeostasis induced either by surgical or chemical stimulation, and the activity of pulp cells regulates the calcification of pulp tissue.

Pulp stones are calcified bodies in the dental pulps of the teeth, which can be seen in the pulps of healthy, diseased, and even un-erupted teeth in the primary and permanent dentition. Dental pulp stones may be free, attached, or embedded in the coronal or radicular pulp. They are considerably more common in the pulp chamber than in the root canal and may occur in a single tooth or several teeth.

Although pulp stones have no clinical significance, they lead to complications when endodontic therapy is needed.

As you can see in the video, their large size in pulp chamber may block access to canal orifices and alter the internal anatomy, and attached stones may deflect or engage the tip of exploring instruments, preventing their easy passage down the canal. In this kind of situation the use of the surgical microscope is mandatory.

This video has been done with a Labomed Magna microscope and Canon EOS camera.

“You can only treat what you can see”.

PhD. MSc. Dr. Pablo Salmeron.

Pulp Horn Amputation

Today’s case is a 11 year old patient with a big caries on the second maxillary molar referred to me to save the tooth. My duty as endodontist is not only providing root canal treatments but also preserving teeth from them too.

In this particularly case I performed a pulp horn amputation.

pulpotomy

These are the steps taken:

– Rubber dam isolation.

– Microscope magnification.

– Manual removal of the soft dentin with excavator.

– Pulp horn amputation.

– Disinfected and rinsed with NaOCl from “outside” to achieve haemostasis.

– Dried with sterile cotton pellets.

– Bioceramic capping.

– Direct glass ionomer as temporally filling on top.

Dentistry today is about the small details.

PhD. MSc. Dr. Pablo Salmeron.